The ArC TWO Platform
High-level description of ArC TWO
ArC TWO is essentially a 64-channel, fully parallel SMU array and 2× banks of 32 digital pins. The instrument also features a shared current source. The entire system is coordinated by an FPGA EFM-03 development board with Xilinx XC7A200T-2FBG676I chip. ArC TWO has been engineered to provide high-throughput, parallel testing at high levels of accuracy.
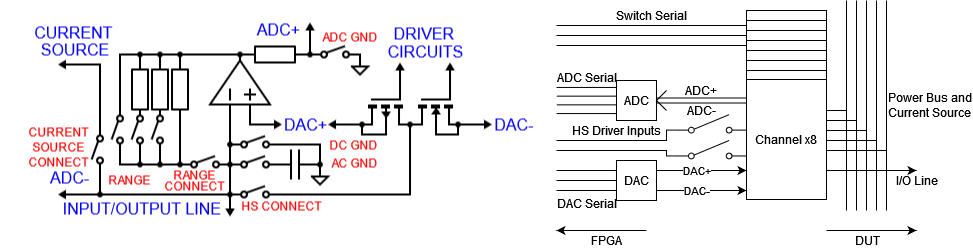
(left) Schematic of channel architecture: Significant wires in blue, analogue switches in red; (right) Schematic of the structure of the channel cluster
The main subsystem of the board is the SMU channel. It consists of: (a) a programmable gain trans-impedance amplifier (TIA); (b) an independent pulse generator used for high-speed pulsing and (c) a switch which allows the channel to access the current source. Data converter terminals are connected as shown in the figure above to provide biasing with digital to analogue converters (DACs). This allows the channel to act as a tuneable source, or to read voltages with differential analogue to digital converters (ADCs) at selected nodes for measurement. ArC TWO features 8 channel clusters for a total of 64 independent SMU channels.
The digital interface bridges the gap between the PC and the analogue circuitry of ArC TWO. The basic structure contains a USB 3.0 IP core, a FIFO buffer, block memory, a transmission layer and a control layer. All IPs are linked through and Advanced eXtensible Interface (AXI) which is a universal high-performance interface.
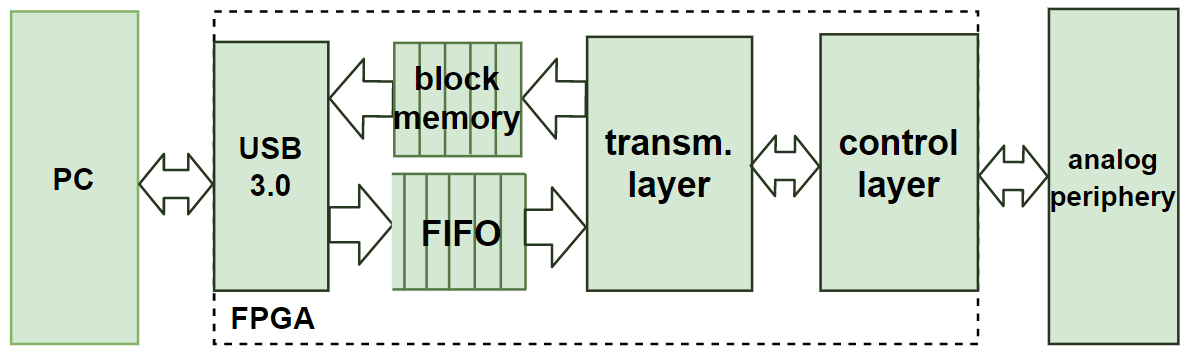
Hierarchy of the digital interface implemented by ArC TWO
The instruction set has been designed for translating a relatively small set of high-level operations into board language. These are: select channels, emit pulse, read from channel(s) as well as set current (for the shared current source) and a few more specialised commands. In hardware, this translates to configuring the high-speed pulse drives, DACs, ADCs, switches and digital pins. All advanced functions can be performed through a combination of the basic set of commands. The transmission layer performs the translation from PC-level instructions to PCB-level and the control layer executes the latter. A native library, libarc2, has been developed to aid in the assembly of high level operations (read, pulse, ramp, etc) into board level commands. Python bindings for libarc2, pyarc2 (documentation), are also available as an easier-to-use interface to develop user-level applications. ArC TWO Control is also built on pyarc2.
Minimum system requirements
ArC TWO requires a Windows 10/11 or Linux computer with at least 4 GB of RAM (8 GB or more recommended). A USB-3.0 port is also required to allow ArC TWO to operate at full speed. Please note that on Linux the minimum glibc supported by ArC TWO is 2.14. This essentially means every distribution newer than CentOS 7. Additionally libusb-1.0 is required which should be available on most distributions released after 2015. Linux systems based on musl libc (for instance Alpine Linux) are not supported.
Getting started
Installation of the CESYS USB Drivers
ArC TWO is an FPGA-based tool and uses a Xilinx FPGA implementation provided by CESYS GmbH: the EFM-03. In order for ArC TWO to operate you need to install the CESYS USB Drivers for your operating system. On Windows you need to install the udk3usb drivers from the CESYS beastlink distribution (beastlink-1.0-windows-free → driver → udk3usb-drivers-windows-1.3.exe). For Linux, packages for Debian and RHEL-based distributions are available from our server. Scripts that generate these packages for your distribution are available from our github.
Out of the box
The standard ArC TWO package comes with the following components: (a) The ArC TWO board; (b) a 18 V power adaptor with its corresponding power module; (c) a power module for external power supplies; (d) a PLCC32 daughterboard with headers for probe-card support and (e) a USB-3.0 cable. Depending on your configuration some components might be pre-assembled on ArC TWO.
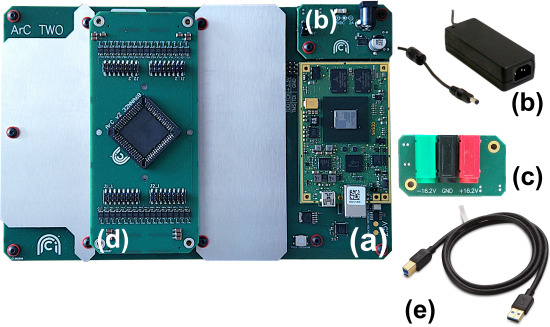
ArC TWO and standard accessories
Danger
The FPGA board has a single jumper that controls its power supply. The FPGA is not powered by the USB but rather the power supply of ArC TWO itself. As such the jumper must always remain unpopulated.
To power up the board, plug in the provided AC power adaptor and flick the power switch. If you intend to use a laboratory power supply instead remove the retaining screws of the standard power module and replace it with the external power supply module. Then tighten the retaining screws again and plug in an external supply to the corresponding banana sockets. Please note that you need both 16.2 V and -16.2 V sources and a minimum of 1 A on both to properly power the board.
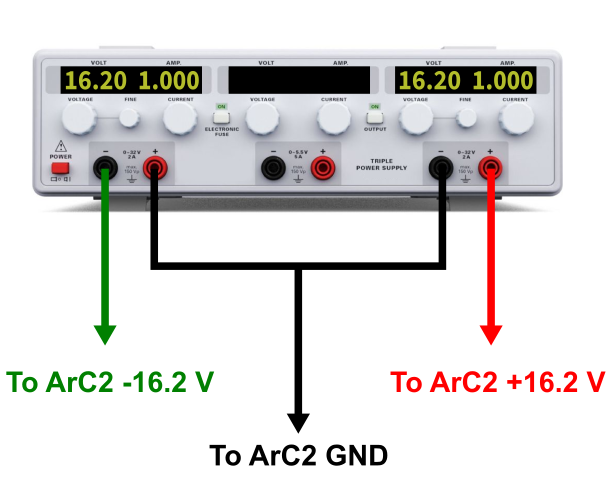
Powering ArC TWO with a laboratory power supply
ArC TWO supports many different daughterboards for maximum connection flexibility. By default the 32NNA68 daughterboard is installed which exposes all 64 channels of ArC TWO as header pins and also features a PLCC socket for packaged samples. Typical cavity sizes for these packages are (in inches) 0.265×0.265, 0.3×0.3, 0.4×0.4 and 0.46×0.46. Additional daughterboards are available with SMA (32 channels) or BNC connectors (12 channels).
The ArC TWO Firmware
ArC TWO requires the FPGA firmware to be loaded at boot. If you are using ArC2Control then firmware can be managed directly from the GUI. If you are developing with Python you will need a copy of the latest firmware along with your script. The latest firmware version is usually available directly from our website and a list of all published firmwares can be found here.
Interacting with ArC TWO
At this point you should have everything ready to start interacting with your ArC TWO. There are three distinct software components that make up the ArC TWO ecosystem
The low-level library: libarc2
Quick links: 


The libarc2 library implements the low-level API for interacting with ArC TWO. It is written in Rust and allows users to be as close to the hardware as they need down to individual instruction pipelining. It is, however, intended for experienced users and for this reason we also provide pyarc2 which a not so low level Python wrapper around libarc2.
The Python library: pyarc2
Quick links: 

The pyarc2 library wraps libarc2 and exposes a Python API. It is our most mature component and it is the recommended way to get started with ArC TWO. New versions are published frequently to PyPI and our github to reflect changes, bugfixes and new features implemented in the low-level library.
To get started you will need a recent Python (≥3.9) and an ArC TWO firmware file. You can install pyarc2 directly from pypi
python -m pip install pyarc2
You can then start implementing your experiment logic.
 from pyarc2 import Instrument, find_ids

# low voltage channel (typically grounded)
LOWV = 7
# high voltage channel
HIGHV = 33
# read-out voltage
VREAD = 0.2

# Get the ID of the first available ArC TWO
arc2id = find_ids()[0]

# firmware; shipped with your board
fw = 'arc2fw.bin'

# connect to the board
arc = Instrument(arc2id, fw)

current = arc.read_one(LOWV, HIGHV, VREAD)
print('I = %g A' % current)
For more information refer to the documentation of pyarc2.
The ArC TWO Control GUI
Our ArC TWO Control application (ArC2Control) which is the reference python application built with pyarc2 and Qt for interacting with crossbar arrays (ie devices broadly split in wordlines and bitlines). ArC TWO control is under development but if you have git installed you can test the latest snapshot by running
python -m pip install git+https://github.com/arc-instruments/arc2control
Then you can run it with
python -m arc2control
For user’s and developer’s information on ArC TWO please refer to the ArC2Control documentation.