ArC2Control emodules
Introduction
ArC TWO Control Panel provides a mechanism for users to create their own experiments using ArC TWO. These are typically specialised control panels that are registered during program startup and are available from the main ArC TWO Control Panel Experiment dropdown menu. We call the control panels external modules or emodules. This document serves as a tutorial to help you develop your own modules.
An emodule is essentially a standalone Python project that exposes a few interfaces that are compatible with the ArC TWO Control Panel. ArC2Control emodules should be placed at the corresponding data directory for your operating system. On Windows these directories are (higher to lower priority)
%APPDATA%\arc2control\arc2emodulesC:\ProgramData\arc2control\arc2emodulesPYTHONDIR\arc2controlPYTHONDIR\data\arc2control
and on Linux these are (higher to lower priority)
~/.local/share/arc2control/arc2emodules/usr/local/share/arc2control/arc2emodules/usr/share/arc2control/arc2emodules
Regardless of the path you choose an empty __init__.py file must be
created under arc2emodules to allow custom modules to be loaded from
there.
A typical tree structure for an emodule called testmodule located
in %APPDATA%\arc2control would look like this
testmodulearc2emodules
├── __init__.py ← this must exist for any emodule to be loaded
└── testmodule ← toplevel directory of our emodule
├── __init__.py ← module metadata and identifiers
├── testmodule.py ← module code with entry-point
└── another.py ← additional python source used by this module
Of course modules can span multiple files, can have compilation steps and anything else that might be required for your use case.
Anatomy of an emodule
Note
The module system for ArC TWO Control Panel heavily depends on the Qt framework and its Python bindings. Although an attempt has been made to make this guide as agnostic as possible a degree of familiarity with the Qt framework (in any language) would go a long way.
For an emodule to be loaded into ArC2Control two things must be true: (a) Its
__init__.py must specify the entry point of the module and (b) the entry
point must derive from BaseModule which
essentially is a custom Qt6 QWidget with some extra quality of life improvements
bolted in.
Going back to our example testmodule emodule this is how a correct
__init__.py would look like
# Human readable name for the module - No whitespace
MOD_NAME = 'TestModule'
# A unique identifier
MOD_TAG = 'TSM00'
# A descriptive line of text
MOD_DESCRIPTION = 'Demonstrate the emodule functionality'
# Always False for modules residing outside the arc2control repository
BUILT_IN = False

# define the main class for this emodule; the entry point
from .testmodule import TestModule
ENTRY_POINT = TestModule
It should be mentioned that the MOD_TAG field must be a unique identifier
for your module. There are no checks for identifier clash allowing you to
possibly override built-in modules by reimplementing them as emodules to add
or alter functionality. It is recommended that you avoid overriding internal
tags unless you really know what you are doing. Things might fail spectacularly
otherwise.
Once __init__.py is filled in you can proceed into developing the logic of
your emodule. In this example the logic is implemented in
testmodule/testmodule.py.
testmodule/testmodule.pyfrom PyQt6 import QtWidgets
from arc2control.modules.base import BaseModule
from . import MOD_NAME, MOD_TAG, MOD_DESCRIPTION
class TestModule(BaseModule):
def __init__(self, arc, arcconf, vread, store, cells, mapper, parent=None):
# calling superclass constructor with all the arguments
BaseModule.__init__(self, arc, arcconf, vread, store, MOD_NAME, \
MOD_TAG, cells, mapper, parent=parent)
# build the UI
self.setupUi()
# make the button do something
self.runButton.clicked.connect(self.onRunClicked)
def setupUi(self):
self.setObjectName('TestModuleWidget')
self.gridLayout = QtWidgets.QGridLayout(self)
self.gridLayout.setContentsMargins(0, 0, 0, 0)
spacer00 = QtWidgets.QSpacerItem(0, 20, \
QtWidgets.QSizePolicy.Policy.Expanding, \
QtWidgets.QSizePolicy.Policy.Minimum)
self.gridLayout.addItem(spacer00, 2, 1, 1, 1)
spacer01 = QtWidgets.QSpacerItem(20, 0, \
QtWidgets.QSizePolicy.Policy.Minimum, \
QtWidgets.QSizePolicy.Policy.Expanding)
self.gridLayout.addItem(spacer01, 7, 0, 1, 1)
self.horizontalLayout = QtWidgets.QHBoxLayout()
spacer02 = QtWidgets.QSpacerItem(40, 20, \
QtWidgets.QSizePolicy.Policy.Expanding, \
QtWidgets.QSizePolicy.Policy.Minimum)
self.horizontalLayout.addItem(spacer02)
self.runButton = QtWidgets.QPushButton(self)
self.runButton.setObjectName("runButton")
self.horizontalLayout.addWidget(self.runButton)
spacer03 = QtWidgets.QSpacerItem(40, 20, \
QtWidgets.QSizePolicy.Policy.Expanding, \
QtWidgets.QSizePolicy.Policy.Minimum)
self.horizontalLayout.addItem(spacer03)
self.gridLayout.addLayout(self.horizontalLayout, 8, 0, 1, 2)
self.label = QtWidgets.QLabel(self)
self.label.setText("Example label")
self.gridLayout.addWidget(self.label, 0, 0, 1, 1)
def onRunClicked(self):
print('Clicked!')
Most of the code above deals with setting up the UI, it is fairly standard Qt
code. The most important part is probably the constructor of the class which
takes a bunch of arguments. These are populated by ArC2Control when you
activate the new panel on the main GUI so you should not need to deal with them
directly. They will be connected to properties by the superclass,
BaseModule and will be available to use from
within your new emodule.
Starting ArC2Control again a new entry, TestModule, should be available from the experiment dropdown menu. Clicking add will activate the following panel and clicking Run will print “Clicked!” on your terminal.
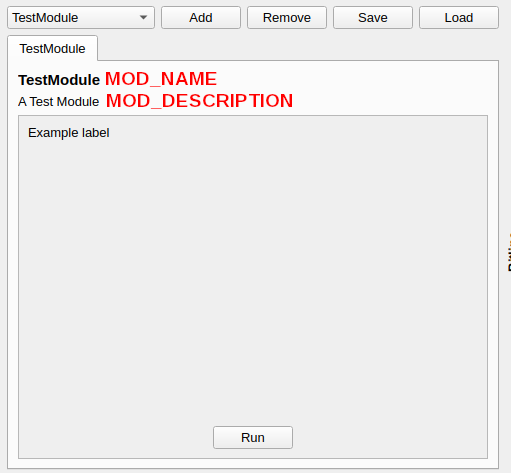
A basic emodule panel
As it is now the Run button does not do anything useful. We will modify it to perform a current read on the specified crosspoint if an ArC TWO is available.
onRunClickeddef onRunClicked(self):
# self.cells is a set containing the current selection, we will only
# one if available
try:
cell = list(self.cells)[0]
except IndexError:
# nothing selected; break
return
# get wordline and bitline from the cell
(w, b) = (cell.w, cell.b)
# convert it into an ArC TWO channel using the self.mapper.wb2ch
# wb2ch is a dict property populated automatically by ``BaseModule``
# and points to the current channel mapper.
(high, low) = self.mapper.wb2ch[w][b]
# the current global read-out voltage; populated automatically by
# ``BaseModule``.
vread = self.readoutVoltage
# self.arc is populated by ``BaseModule`` and will return ``None`` if
# no ArC TWO is currently connected.
if self.arc is not None:
# do a current measurement
current = self.arc.read_one(low, high, vread)
# set channels back to the currently configured idle mode
# (again populated automatically by ``BaseModule``)
self.arc.finalise_operation(self.arc2Config.idleMode)
print('I = %g A' % current)
The above example performs a current read on the first selected device and prints the result in the terminal. The ArC TWO related functionality is exposed by pyarc2 so consult its documentation for specific information.
Please note that ArC TWO doesn’t have any concept of crosspoints. It will do
operations on any of the 64 channels which can be interconnected arbitrarily.
In order to convert between abstract channels and something more meaningful
like word- and bitlines a mapping mechanism is provided. Depending on your
applications and active daughterboard different mappings might be relevant. On
the code above the active cell coordinates are converted to the underlying
channel numbers via the mapper property available on all subclass of
BaseModule. The superclass code takes care of any changes in the mapper
introduced by the user automatically so that self.mapper will always point
to the currently active mapping scheme. You can read more about the mapper API
or how to crate new mappings on a subsequent section.
Backgrounding operations
Warning
You should only run only one background operation at a time. Although ArC TWO provides locking semantics there is no fencing mechanism for synchronisation and running two command queues at the same time will lead to resulting data being received out of order.
The above example presents a relatively simplistic way of interacting with ArC
TWO. However for more complex operations such as a voltage ramp, for example,
implementing the logic of the operation in the callback will result into the
main GUI blocking and becoming unresponsive (this is a common issue with UI
toolkits in general). In order to avoid that and have some degree of
interactivity we should introduce background operations. These essentially
are background threads that are I/O bound (ie. slow but not very
computationally expensive). Qt provides quite a sophisticated threading library
and you can in fact start implementing operations right away with QThreads,
however you still need to monitor ArC2Control for changes in read-out voltage,
selections, etc. In order to avoid repetition a simple
BaseOperation class is provided. Similar to
BaseModule it will abstract away some
boilerplate code and will expose several primitives as properties. You only
need to implement its run()
method and start the operation as any other QThread. Let’s add such a class to
testmodule/testmodule.py.
TestModuleOperation added to testmodule/testmodule.pyimport time
from arc2control.modules.base import BaseOperation
from PyQt6.QtCore import pyqtSignal
# signal emitted when a new value is received
newValue = pyqtSignal(float)
class TestModuleOperation(BaseOperation):
def __init__(self, parent):
super().__init__(parent=parent)
def run(self):
# pickup the first selected cell
try:
cell = list(self.cells)[0]
vread = self.readoutVoltage()
(high, low) = self.mapper.wb2ch[cell.w][cell.b]
except IndexError:
# or exit if nothing is selected
self.operationFinished.emit()
return
for _ in range(10):
# do a current measurement
current = self.arc.read_one(low, high, vread)
# communicate the new value to the UI
self.newValue.emit(current)
self.arc.finalise_operation(self.arc2Config.idleMode)
# artificial wait time
time.sleep(1)
self.operationFinished.emit()
There are two particular points of note on the example above. First, the
run function which implements the logic of the long running operation. This
essentially does 10 subsequent readings on the first selected device with an 1
sec delay between them. Second it’s the introduction of custom signals as class
attributes. Signals are used to communicate the status of the background
operation to the main UI. This is similar to built-in signals such as
clicked, triggered, etc. that are exposed by regular UI components but
they carry custom values instead. In order to pick up a new value from the
background thread one needs to connect the signal to a python function. Let’s
update our onRunClicked function of TestModule to launch a measurement
thread. Operations deriving from
arc2control.modules.base.BaseOperation always have the
operationFinished signal pre-defined which is conventionally used to mark
the end of the operation. You can see that we emitted operationFinished on
the last line of the example above.
onRunClicked to launch and monitor a threaddef onRunClicked(self):
# callback called whenever a new value is produced
def onNewValue(value):
print('I = %g A' % value)
# callback called when the thread exits
def onFinished():
self.operation.wait()
self.operation = None
try:
if self.operation is not None:
# an operation is currently running; abort
return
except AttributeError:
self.operation = None
self.operation = TestModuleOperation()
self.operation.newValue.connect(onNewValue)
self.operation.operationFinished.connect(onFinished)
self.operation.start()
The code above will launch TestModuleOperation in background. For
illustration purposes we connect the two signals emitted to two nested
functions, although these can be any type of function reference. It is
important to note that we should make sure that we should only launch one
operation at a time to avoid concurrent access to ArC TWO. In order to do that
we start the operation only when self.operation is not defined at all or
it’s None. Every time a new value is produced by the thread the
onNewValue function is called which subsequently prints the value on the
terminal. When the thread is finished the onFinished function is called.
This will first wait for the thread to actually terminate (ie. the run
function of the thread to return) and when that’s done the reference to
the operation is set to None and the thread is finally dropped. A new
operation can now be launched if required.
Storing data
Note
You can read about the storage system in detail on a follow-up section. Familiarity with HDF5 format or the h5py module will also be helpful.
In all of the examples above we just print the data to the terminal, we do not
actually store any data. ArC2Control uses an HDF5-based file format to store
all data produced by modules, either buit-in or external. Every emodule has
access to the currently enabled dataset via the datastore property. As
with other properties these are updated automatically whenever a change has
occurred on the main GUI.
Data is stored on disk on a single HDF5 file with an hierarchical format. The data file contains all biasing history for every device as well as the latest current and voltage values of the full crossbar. Apart from that the datastore supports two types of experiment: (a) crosspoint-bound experiments that are specific to a single crosspoint and (b) synthetic experiments that span multiple crosspoints. Scenario (a) would probably be the most common if you only do individual device characterisation.
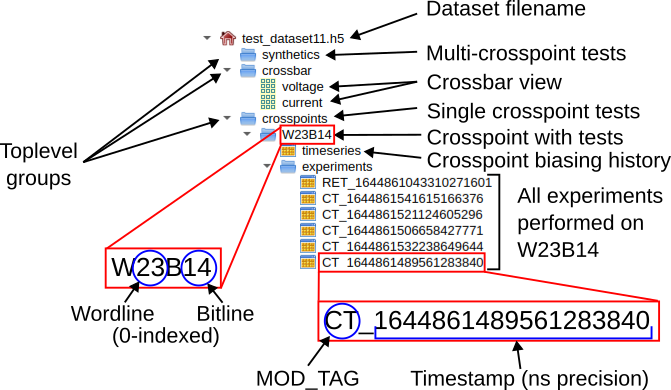
Structure of the HDF5 data file used by ArC2Control
The data file is organised as shown in the figure above. The toplevel groups as
well as the voltage and current crossbar view are always created
automatically when a new dataset is created. Generally you should not need to
create HDF5 groups, or even datasets, manually as calling
make_wb_table() or
make_synthetic_table() will create the
necessary groups and tables automatically. Of course, if you know what you are
doing, the actual h5py.Dataset is available through the
dataset() method. Knowing these let’s
modify TestModuleOperation to save the data to the datastore at the end
of the operation.
TestModuleOperation to save data at the end of the
process.import time
import numpy as np
from arc2control.modules.base import BaseOperation
from PyQt6.QtCore import pyqtSignal
from . import MOD_TAG
# signal emitted when a new value is received
newValue = pyqtSignal(float)
# this a numpy dtype to store data
_DTYPE = [('current', '<f4')]
class TestModuleOperation(BaseOperation):
def __init__(self, parent):
super().__init__(parent=parent)
def run(self):
# pickup the first selected cell
try:
cell = list(self.cells)[0]
vread = self.readoutVoltage()
(high, low) = self.mapper.wb2ch[cell.w][cell.b]
except IndexError:
# or exit if nothing is selected
self.operationFinished.emit()
return
data = np.empty(shape=(10, ), dtype=_DTYPE)
for idx in range(10):
# do a current measurement
current = self.arc.read_one(low, high, vread)
data[idx] = current
# communicate the new value to the UI
self.newValue.emit(current)
self.arc.finalise_operation(self.arc2Config.idleMode)
# artificial wait time
time.sleep(1)
self.storeData(cell.w, cell.b, data)
self.operationFinished.emit()
def storeData(self, word, bit, data):
store = self.datastore
# make a new table to store the data
dset = store.make_wb_table(word, bit, MOD_TAG, \
data.shape, _DTYPE)
# allocate values column-wise; in this case one column
for field in _DTYPE:
dset[:, field] = data[field]
The code above should be relatively straightforward: we create a numpy array to
store the readings and at the end of the process we commit it to the dataset by
column-wise assignment. It’s probably important to mention that HDF5 datasets
are strongly typed and in h5py this is done via numpy dtypes for numpy
structured arrays. It is convenient, in this case, to allocate an array to
store the data and then broadcast it over the dataset. Of course, that’s only
one way to store data; you could, for instance, allocate a dataset at the start
of the process and save the data line-by-line which would work equally well.
The datasets require an identifier, and although you could probably use
anything, it is recommended that you use the MOD_TAG defined when
initialising the emodule.
Communicating changes to the ArC2Control UI
So far we’ve seen how to apply an operation on a selected crosspoint and store
the resulting data in the datastore. What you may have noticed, however, the
main UI (essentially the graph panel) does not get updated with the latest
data. This happens because the main UI does not have any insight into the inner
workings of each module. In order to communicate changes to the UI and also
update the global history of a device a module would need to emit some
signals that will be picked up by the UI and update the interface. Similar to
the custom signal newValue, that we defined in our TestModuleOperation
the main ArC2Control UI also defines some signals that are globally available
to modules. The full list of the signals defined from
ArC2Control is available although for emodule development the most useful ones
are (i) valueUpdate() to update the current voltage
and current status of a crosspoint with a single value; (ii)
valueBulkUpdate() that does the same using numpy
arrays for multiple data updates and (iii)
arc2control.signals.dataDisplayUpdate() to request a refresh of the
plotting panels on the main UI. Let’s update our run function to update the
crosspoint status on every loop and request a data display refresh at the end.
TestModuleOperation to communicate data changes
to the main ArC2Control GUI.import time
import numpy as np
from arc2control.modules.base import BaseOperation
from arc2control.signals import valueUpdate, dataDisplayUpdate
from arc2control.h5utils import OpType
from PyQt6.QtCore import pyqtSignal
from . import MOD_TAG
# signal emitted when a new value is received
newValue = pyqtSignal(float)
# this a numpy dtype to store data
_DTYPE = [('current', '<f4')]
class TestModuleOperation(BaseOperation):
def __init__(self, parent):
super().__init__(parent=parent)
def run(self):
# pickup the first selected cell
try:
cell = list(self.cells)[0]
vread = self.readoutVoltage()
(high, low) = self.mapper.wb2ch[cell.w][cell.b]
except IndexError:
# or exit if nothing is selected
self.operationFinished.emit()
return
data = np.empty(shape=(10, ), dtype=_DTYPE)
for idx in range(10):
# do a current measurement
current = self.arc.read_one(low, high, vread)
data[idx] = current
# communicate the new value to the UI
self.newValue.emit(current)
self.arc.finalise_operation(self.arc2Config.idleMode)
# and update the crosspoint status; we've put 0.0
# as a pulse width since this is a Read operation
# that's also the reason why ``vpulse`` and ``vread``
# are identical
valueUpdate.emit(cell.w, cell.b, current, vread, 0.0,
vread, OpType.READ)
# artificial wait time
time.sleep(1)
# finally request a display refresh for our crosspoint
dataDisplayUpdate.emit(cell.w, cell.b)
self.storeData(cell.w, cell.b, data)
self.operationFinished.emit()
def storeData(self, word, bit, data):
store = self.datastore
# make a new table to store the data
dset = store.make_wb_table(word, bit, MOD_TAG, \
data.shape, _DTYPE)
# allocate values column-wise; in this case one column
for field in _DTYPE:
dset[:, field] = data[field]
In the updated example the valueUpdate() is emitted
every time a reading is done. Our module has relatively slow repetition so
updating values at every step is acceptable. However if you are pulling large
amounts of data quickly from ArC TWO then it would probably make better sense
to buffer the data and use valueBulkUpdate() on
specific intervals instead. Finally, after the loop has finished,
arc2control.signals.dataDisplayUpdate() is called to force refresh of the
main UI graphing panel. You can do data display updates faster or slower depending
on the amount and rate of data you are reading from ArC TWO. You should always
keep in mind that very frequent UI updates will result in your main UI thread
consuming too much CPU time so you should throttle the data display refreshes at
a reasonable level. A few displays per second is probably fine, but many thousands
will lead to massive slowdowns on the main UI thread.
Displaying data
One additional facility provided by ArC2Control emodules is the capability to display custom display and analysis widgets tied to a specific module. In the example below double-clicking on the CurveTracer entry in the device history tree will bring up a representation of the data for this specific experiment.
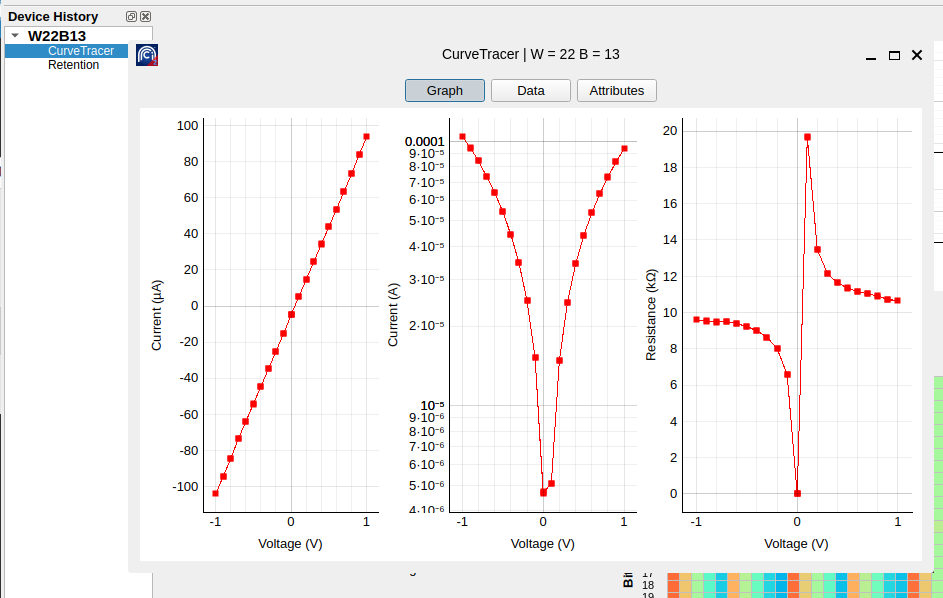
Double clicking a module name on the device history tree will bring up a suitable data display widget
Data display widgets can be any type of widget that derives from QWidget.
That means you can have full featured visualisation and analysis tools for your
custom experiments. This facility is typically provided by the static method
display provided by the main panel of the module, in this case our
TestModule. The method must return anything that subclasses QWidget.
or just a QWidget. In this exampe we will add a display method that
plots our readings.
display function to TestModule to plot acquired
data.from PyQt6 import QtWidgets
from arc2control.modules.base import BaseModule
from . import MOD_NAME, MOD_TAG, MOD_DESCRIPTION
import pyqtgraph as pg
class TestModule(BaseModule):
# rest of the implementation omitted for brevity
@staticmethod
def display(dataset):
current = dataset['current']
wdg = QtWidgets.QWidget()
layout = QtWidgets.QVBoxLayout()
gv = pg.GraphicsLayoutWidget()
plot = gv.addPlot()
plot.getAxis('left').setLabel('Current', units='A')
plot.getAxis('bottom').setLabel('Reading #')
plot.showGrid(x=True, y=True)
plot.plot(range(0, current.shape[0]), current, pen='r')
layout.addWidget(gv)
wdg.setLayout(layout)
return wdg
The only argument to the display method is the dataset associated with
entry the user selected on the main GUI which is exactly the same dataset we
created with the associated functions before. In this specific example above we
construct a QWidget, add a layout and a graphing widget. We use pyqtgraph
for plotting, which is the same library used by ArC2Control and it’s always
available to the modules. Of course, depending on your requirements, you can
use matplotlib or any other visualisation package. When the user activates
the entry on the device history tree the widget returned by display will
be put on window and displayed to the user, pretty much identically to the
CurveTracer figure shown above.
Using QtDesigner
Although using Qt fully programmatically to generate UIs is the most straightforward way to get started many users will find much more user friendly to use the visual Qt Designer utility to generate interfaces. Qt Designer is provided with Qt Creator although it does not need the full package and can operate independently.
Using a visual designer tool will typically require the generation of Python
classes out of the interface (*.ui) files. This can be done manually with
the pyuic6 utility supplied with the PyQt6 distribution. The autogenerated
classes can be used as base classes to build your own experiment panel without
having to build the UI using code. Iterating through UI designs, however, can
be error prone and quite repetitive. For that reason, ArC2Control also provides
a mechanism to automatically compile UI files into Python classes on runtime
through the uiToModule() function. The generated
class will be mounted under a module of your choice. You are free to choose any
module identifier however ArC2Control uses generated as a standard
convention. Assuming your UI file is located under the uis directory you
can do the following to autogenerate a module that includes your visually
designed classes.
from arc2control.modules import uiToModule
from arc2control.modules.base import BaseModule
from . import MOD_NAME, MOD_TAG

__HERE__ = os.path.dirname(__FILE__)
generated = uiToModule(os.path.join(__HERE__, 'uis', 'iface.ui'), 'generated')
Ui_IfaceWidget = generated.Ui_IfaceWidget

# Ui_IfaceWidget now contains all the autogenerated code and can
# be used as a parent class for your own classes
class Iface(BaseModule, Ui_IfaceWidget):
    def __init__(self, arc, arcconf, vread, store, cells, mapper, parent):
         Ui_IfaceWidget.__init__(self)
         BaseModule.__init__(self, arc, arcconf, vread, store,
             MOD_NAME, MOD_TAG, cells, mapper, parent=parent)
         # proceed as normal
Logging information
Regardless of the complexity of your module you will eventually have to log
information. The humble print can get you quite far but you might need
something more structured. Both arc2control.modules.base.BaseModule
and arc2control.modules.base.BaseOperation expose the logger
property that plugs into the main ArC2Control logging facility. You can then
log information to the console in varying degrees of severity. The verbosity of
the messages is controlled by an environment variable set before launching
ArC2Control: ARC2CTRL_LOGLEVEL which can be any of critical, error,
warn, info, debug with increasing degree of verbosity and
decreasing severity. At any given logging level only message of equal or higher
severity will be displayed. The default logging level is warn. With that in
mind you can log information at varying severity levels like this
>>> self.logger.error('An error message; this will typically halt the module')
[ERROR] [TSM00] An error message; this will typically halt the module
>>> self.logger.warn('Something went wrong; results may be unreliable')
[WARNING] [TSM00] Something went wrong; results may be unreliable
>>> self.logger.info('Useful information')
[INFO] [TSM00] Useful information
>>> self.logger.debug('Detailed info about the module runtime')
[DEBUG] [TSM00] Detailed info about the module runtime
You can read more about Python’s logging facilities in the official documentation.
Final words
This concludes our tour of the module facility of ArC2Control. You can use this tooling to create your own experiments, simple or complex, to tailor the capabilities of ArC TWO to your own needs. You can find more details on the data store, channel mapping and signal APIs in the following sections.
API Reference
- arc2control.modules.allUisToModules(uis, prefix='Ui_')
Compile all Qt Designer UI files listed in
uisinto Python modules using pyuic6. This function is similar to :meth:~arc2control.modules.uiToModule but will create a single object that holds the types for all compiled UIs. This function will only look for classes that start withprefixand attach them as attributes to the returned object. However, the returned object has a flat namespace so if there are two identical class names in the list of the provided UIs an exception will be raised.from arc2control.modules import compileUisToModules from arc2control.modules.base import BaseModule, BaseOperation from . import MOD_NAME, MOD_TAG, MOD_DESCRIPTION uis = ['/path/to/iface01.ui', 'path/to/iface02.ui'] generated = compileUisToModules(uis) # now this can be used as base class as usual class Iface(BaseModule, generated.Ui_IfaceWidget): def __init__(self, parent): generated.Ui_IfaceWidget.__init__(self) BaseModule.__init__(self, arc, arcconf, vread, store, MOD_NAME, MOD_TAG, cells, mapper, parent=parent) # proceed as normal :param list uis: A list of paths with Qt UI files :param str prefix: Prefix of classes to look for, default is ``Ui_`` :returns: An object holding all the compiled UI classes as attributes :raises ValueError: If two identical UI classes are found in the list of provided files
- arc2control.modules.uiToModule(src, name)
Compile a Qt Designer UI file into a Python module using pyuic6. This function allows for on-the-fly parsing and importing of a UI file into a Python module so that an external compilation step is not necessary.
from arc2control.modules import uiToModule
from arc2control.modules.base import BaseModule, BaseOperation
from . import MOD_NAME, MOD_TAG, MOD_DESCRIPTION

# this effectively does
# >>> from generated import Ui_IfaceWidget
generated = uiToModule('/path/to/iface.ui', 'generated')
Ui_IfaceWidget = generated.Ui_IfaceWidget

# now this can be used as base class as usual
class Iface(BaseModule, Ui_IfaceWidget):
    def __init__(self, parent):
        Ui_IfaceWidget.__init__(self)
        BaseModule.__init__(self, arc, arcconf, vread, store,
            MOD_NAME, MOD_TAG, cells, mapper, parent=parent)
        # proceed as normal
- Parameters:
src (str) – Path to Qt UI file
name (str) – Name of the auto-generated module
- class arc2control.modules.base.BaseModule(arcref, arcconf, vread, store, name, tag, cells, mapper, parent=None)
Base Module for all ArC2Control plugins. A valid ArC2 plugin _MUST_ derive from this class to be properly loaded on startup. The base class will track all UI and instrument changes and exposes the relevant values via properies and methods. The constructor for the module will be typically called with the correct arguments when the user clicks the “Add” button on the experiment panel of ArC2Control
- Parameters:
arcref – A reference to the currently connected ArC TWO
arcconf – The current ArC TWO configuration
vread – Currently configured read voltage
store – A reference to the currently opened datastore
name – The name of this module
tag – A short tag desribing this module
cells – A reference to the current crosspoint selection
mapper – A reference to the current channel mapper
- actions()
Returns actions performed by this module. The actions are discovered automatically if they are decorated with the decorator
modaction(), otherwise this method needs to be overriden.Returns a dict containing all of the registered actions, eg.
>>> module.actions()
>>> # { 'selection': ('Apply to Selection', moduleClass.actionCallback, True) }
Please note that if the
modaction()decorator is used the callbacks are not bound to an object so in order to be called properly an instance of the object must be passed as their first argument.
- addSerializableType(typ, getter, setter)
Register the setters and getters of a non standard widgets that should be serialized with
toJson. Typicallytypwould be a custom widget andsetterandgetterare functions of that custom widget that load and set its state. Custom widgets must be registered with this function in order to be properly serialised to and retrieved from a file.- Parameters:
typ – The widget Python type
getter – The
getfunction to retrieve its valuesetter – The
setfunction to set its value
- property arc
A reference to the currently active ArC TWO instrument, or None, if no connection exists
- property arc2Config
The current ArC TWO configuration
- arc2Present(title, error='No ArC TWO connected')
Checks if an ArC TWO is present. If an ArC TWO cannot be found an additional error can be displayed.
- Parameters:
title (str) – Title of the error dialog. Set to
Noneto suppresserror (str) – Custom error to display; ignored if dialog is suppressed
- property cells
The currently selected cells
- property datastore
A reference to the current datastore. See
H5DataStore.
- property description
Description of the operation of this module. This is typically displayed under the panel name in the main ArC2Control UI. Subclasses must implement this if they need to have a description visible (by default it’s empty).
- fromJson(frag)
Load panel settings from a JSON fragment. Most common widget values are stored automatically but if custom widgets are present the subclass must register a setter and a getter method for the class using
addSerializableType().- Parameters:
frag (str) – The JSON fragment to load from
- fromJsonFile(fname)
Same as
fromJson()but read from a file instead.- Parameters:
fname (str) – The JSON file to load from
- property fullModuleName
The fully qualified python class name
- property logger
Returns the appropriately formatted logger for this module. See the python logging documentation for more.
- property mapper
The current bit/word to channel mapping configuration
- minSelection(title, cells=1, error='Need at least %d device(s) selected')
Checks if at least
cellsare selected and displays an error otherwise. If selected cells are below the threshold an additional error can be displayed.- Parameters:
title (str) – Title of the error dialog. Set to
Noneto suppresscells (int) – Minimum number of selected cells to check for
error (str) – Custom error to display; ignored if dialog is suppressed
- property modargs
Returns a tuple containing all the necessary arguments to pass to a new
BaseModule. This is useful when trying to instantiate modules from within other modules. These areA weak reference to the current ArC2 object, if connected
The current ArC2 configuration
The current read-out voltage
A weak reference to the currently opened dataset
The current crosbbar cell selection
The currently selected Channel Mapper
- property readoutVoltage
The active read-out voltage
- toJson()
Export all the adjustable children of this module to a JSON fragment. All individual widgets must set a unique name using
setObjectNamefor this to work properly. Standard Qt Widgets and custom widgets that are made up from standard widgets are dealed with automatically. For bespoke widgets, these must be registered withaddSerializableType().- Parameters:
fname (str) – The filename of the JSON file to export current module’s values.
- class arc2control.modules.base.BaseOperation(parent=None)
A standard background operation. This is what you probably need to use if you running a long operation using ArC2. It will connect all relevant signals (configuration, mapper, cell selection, etc.) and expose their corresponding values via properties. When a thread based on this operation is started the
runmethod will be called and must be implemented by all subclasses of this class. For convenience a standard Qt signal is also provided which can be emitted to mark the end of the process.- property arc
Reference to the currently connected ArC2 instrument (if any)
- property arc2Config
The currently enabled ArC2 configuration
- property cells
A set of tuples representing the currently selected crosspoints (word, bit).
- property logger
Returns the appropriately format logger for this module. See the python logging documentation for more.
- property mapper
The currently activated channel mapper (see
ChannelMapper).
- operationFinished
Qt Signal conventionally emitted by any operation to mark that the process has finished.
def run(self):
    # complex logic here
    # ...

    self.operationFinished.emit()
- abstract run()
Implement the logic of the operation by overriding this method
- arc2control.modules.base.modaction(key, show=True, desc=None)
This function is typically used as a decorator for actions related to experiment modules. The actions will typically be used to populate the action buttons. All module methods decorated with
modactionwill be automatically registered as actions and a button with thedesctext will be shown below their panel in the experiment tabbed widget (unlessshowisFalse).- Parameters:
key (str) – A unique identifier for this actions.
show (bool) – Whether to show a related button in the experiment panel
desc (str) – A description for this action; this will also be used as the text on the button displayed in the experiment panel area.
- Raises:
KeyError – If a key is used twice
class Experiment(BaseModule):
    # complex logic here
    # ...

    @modaction('selection', desc='Apply to Selection')
    def apply(self):
        # more complex logic here